Sharing the journey of a long time home baker turned hopeful entrepreneur.
Wednesday, May 9, 2012
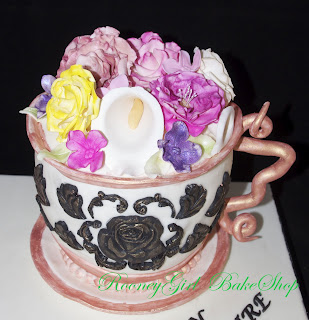
Paris Teacup Cake
As a long time baker, but new to cake decorating business, each cake brings forth a new challenge and new learning experience. This cake was my first sculpted cake and I took on the challenge from my friend who was celebrating her mom's and aunt's (twins, like me :-)) 60th birthday party at Paris in a Cup Tearoom in Orange, CA. I figured for a sculpted cake this was on the simpler side and shouldn't be so bad for a first timer. Well, I underestimated that just a bit! I basically made this cake twice. My first attempt was what I believed to be an awesome and fool proof idea but it just went all wrong. I knew Wilton made these spherical bowls that you would use to make a soccer or basketball cake and I figured that would be great to get the curvature of the teacup at the bottom of the cake. So I baked one half of the sphere and then some 6" round layers. My plan was to stack the 6" cake directly on top of the 1/2 sphere to achieve the look of the teacup. Well, safe to say the weight of 3 layer, 4" tall 6" cake & frosting pretty much smashed the 1/2 sphere until it didn't look like a sphere anymore. So I panicked! What do I do now? How can I achieve this look and keep its structure and sturdiness? My brilliant husband came to the rescue and suggested I build the curved base out of rice krispie treats. Only having seen that used on TV and you tube, I told him it wouldn't work but I'd try it anyway. Short on time, I ran to the store and bought it ready made. I smashed several bars together and shaped it into the half sphere, same size as the cake I so sadly failed with. I place this in the fridge to let the marshmallow harden up a bit and proceeded to rebake the 6" layers that were going on top. I decided to rebake them because I felt the structure had been so compromised before that I didn't feel the 6" cake would withstand more abuse. At this point I decided to call it a night while the cakes chilled in the refrigerator overnight. Tomorrow I will try again. Lucky thing I allowed myself an extra day for prep work just in case I would run into trouble - thank goodness!
Next day, I checked on rice krispie sphere and it was rock hard- perfect! Just to be safe, I also inserted some dowels into it and cut them flush with the rice krispie - I just didn't want another disaster. Then I torted and filled the 6" cake once more. Stacked it on round cardboard and placed that on top of the rice krispie sphere. I covered the whole cake in white chocolate ganache, and let it sit out overnight to dry up before fondanting it the next morning (delivery day). Oh how I could not sleep that night hoping I didn't wake up to smashed blob again.
Yippee! it survived and looked gorgeous. I debated to cover it with fondant or just let it be but I went ahead and covered it luckily my marshmallow fondant behaved very well. I did have some difficulty with the bottom because it was showing some of the dimpling from the uneven rice krispie texture, but I knew I would hide that with a gold band as part of the teacup design. I placed the cake in the fridge to set up for about an hour and then I proceeded to cut out my fondant rose decorations. At this point, due to time constraints, I could not go with my initial plan to paint the teacup with little roses, having not done that before or practiced it I didn't want to chance it so I ended up using a Wilton mold for the roses and decors. I used black fondant and then brushed it with the same champagne luster dust I used on the bottom and top rim of the cup. The handle was made a few days earlier with gumpaste and left to dry with some toothpicks on either end to insert it into the cake. The plate was also made ahead with gumpaste and I used an actual cake as a mold to dry the gumpaste on. That was one of my favorite elements of the cake. My other favorite was the board that I covered in fondant and hand painted the Eiffel tower on it with black food color. I can't believe I drew that but it really was just a grid of lines so I shouldn't be that impressed with myself, but I still was! :)
I topped the cup with handmade gumpaste flowers, also prepared days in advance. I loved this too!
Overall, I was very happy with how this cake turned out and my friend and her mom, aunt, and guests, along with all the patrons at the restaurant absolutely adored the cake! This challenge left me feeling confident and proud that I actually was able to create such a beautiful cake that looked so fragile but was quite strong. Special thanks again to my brilliant husband Bret who gave me the idea of rice krispie treats. I've since used them on other large scale sculpting projects and they are very reliable, I must say.
Thanks for reading - more to come!
Subscribe to:
Post Comments (Atom)


No comments:
Post a Comment